
|
|
| FORUM | AGENDA | WIKI | CHAT | baBeLOG |
|
Home > Long-term > Interpretation equipment ALIS console(Date: 14 September 2008)
Basic introduction to the ALIS console for interpreters. The console has two surfaces, a vertical one with rows of red and green lights, and a horizontal one with a series of knobs and buttons. We shall call the vertical surface the ROOM PANEL (because it gives information about all the booths in your room), and the horizontal surface the BOOTH PANEL (with it you control your own headsets and microphone). 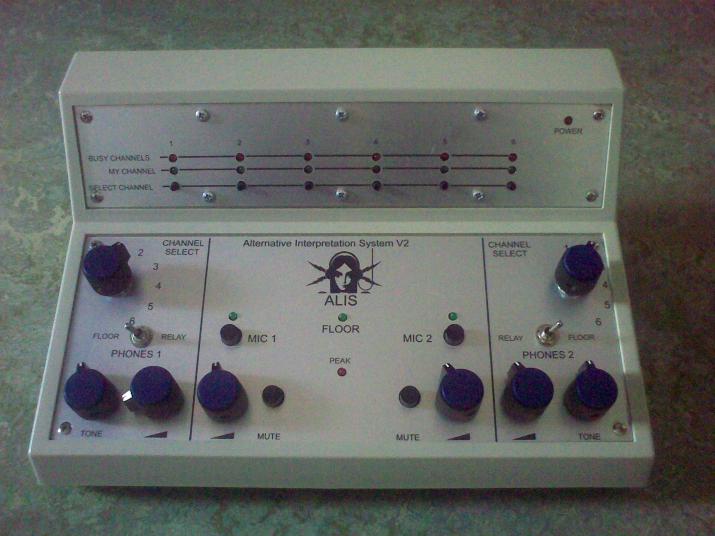
ROOM PANELAt the top right hand corner of the panel there is a red light labeled POWER. This should always be on. Then you see three rows: red lights, green lights and small buttons. BUSY CHANNELS (red lights): This tells you which channels are being used in your room. Several of these lights (up to 6) may be on at the same time. MY CHANNEL (green lights): This tells you which is the channel of your own booth. One of these lights should always be on—the technician will tell you which one it needs to be. If you translate into more than one language you have to use the buttons below to change back and forth between your two channels. If your green light is blinking it means someone in another booth is using that channel. This most often happens when someone has switched languages and has forgotten to switch back. When this happens do not continue working until it’s fixed—double-check that it’s not you who’s on the wrong channel and then inform the technician. SELECT CHANNEL: These buttons allow you to switch between channels when you work into more than one language. BOOTH PANELThis part has two sections. With one you control your headsets, and with the other your microphone. MICROPHONE In the center you have a green and a red light. The red light (PEAK) goes on when your microphone is giving a very loud signal. It’s not necessary for this light to ever go on but it’s not a problem if it sometimes does. If it goes on a lot you may be speaking too close to the microphone or shouting too much. When the green light (FLOOR) is on, the microphones in your booth are off. In this case the people listening to your channel only get the voice of the speaker. To the right and left of these lights you have the microphone controls. At the top there is a button labeled MIC plus a green light. The light tells you if the microphone is on. To turn it on or off you have to keep the button pressed for a second—this is a deliberate feature so it doesn’t get switched by accident, so don’t bang on the button thinking it doesn’t work. It does work, it just takes a second. Below this you have a volume knob next to a MUTE button. The MUTE button silences your microphone but only as long as you keep it pressed. The knob controls the volume of your microphone—generally you should not touch this, the technician will have set it at an appropriate level. HEADSETS On the extreme left and right of the BOOTH PANEL you have the controls for the two headsets. In the middle of this section there is a switch that can be set to FLOOR or RELAY. Set it to FLOOR to hear the speaker. If instead you need to listen to the output of another booth set it to RELAY and select the channel you want to listen to with the CHANNEL SELECT knob at the top of the section. At the bottom of the section there are a further two knobs, one to control the tone and the other to control the volume of your headsets. |
|


 | Private area
|
problemes |
Site Map |
|